Only a few steps away from the stress-free testing of Linux on your computer - a guide

Windows, macOS, Android ... and meanwhile, many companies are still developing free operating systems based on Linux. I understand that you are afraid of switching, even for testing purposes. Fortunately, there is a way.
Linux operating systems are still thriving on desktops, although their popularity is negligible. In truth, I understand this lack of interest: they do not have any added value for a typical user relative to Windows or macOS. But we are not typical. Especially that knowledge about the use of bash or other typical Linux tools may be useful to us at work if we are planning an IT career.
The problem with changing to another operating system, however, is that we risk a lot of lost time. Mechanisms of creating a double boot (where the user can choose which operating system he wants to run) are sometimes unreliable, as well as those that support the partitions shared by both systems. Mending all this in the event of damage rightly scares off less advanced users than experimenting. Unless we use virtualization.
Virtualization of the operating system - unfortunately you will need an efficient computer.
Virtualization - in a very large, though permissible, simplification - is a software simulation of a second computer. Fortunately, it is not identical to the usually very large hardware resources requiring emulation. This means that we will be able to install the operating system on a virtual computer that will not have any contact with our physical machine. Whatever we do not do in the virtual system, it will have no effect on our computer.
Unfortunately, it should be remembered that virtualization is implemented through a dedicated application. This in turn means that our computer will have to simultaneously support two operating systems. Unfortunately, without at least 6 GB of RAM and a fast dual-core (or preferably quad-core) processor this game will be less comfortable or even impossible.
Linux virtualization - before we get started, let's get ready for this fun. That is the first step.
We will need two things. First of all, an operating system that we want to virtualize. For the purposes of this text, we will use Ubuntu 18.10, the most recent version of the user-friendly and quite popular version of Linux. We can download it and use it free of charge from this address . Of course, we can also virtualize any other operating system compatible with the architecture of our processor and available as a downloadable installation image.
Secondly, we will need a virtualization application. And here the bad news begins. Most applications of this type are paid. In this text I will use the application (actually a service) of Hyper-V, which is part of all Windows versions except the Home edition. A similar mechanism that will also work on Windows Home (and macOS) is the free Oracle VirtualBox . I also worked well with the paid VMware Workstation . I have never played virtualization on macOS systems, but almost everyone recommends Parallels Desktop - also paid.
Installation and maintenance of all the above applications is very similar. They all offer easy-to-understand wizards, so although this text will be illustrated with Microsoft Hyper-V dumps, they should be enough to know how to configure the application from another provider. Especially that - as you will see immediately - it is quite simple.
Step two - we create a new virtual machine.
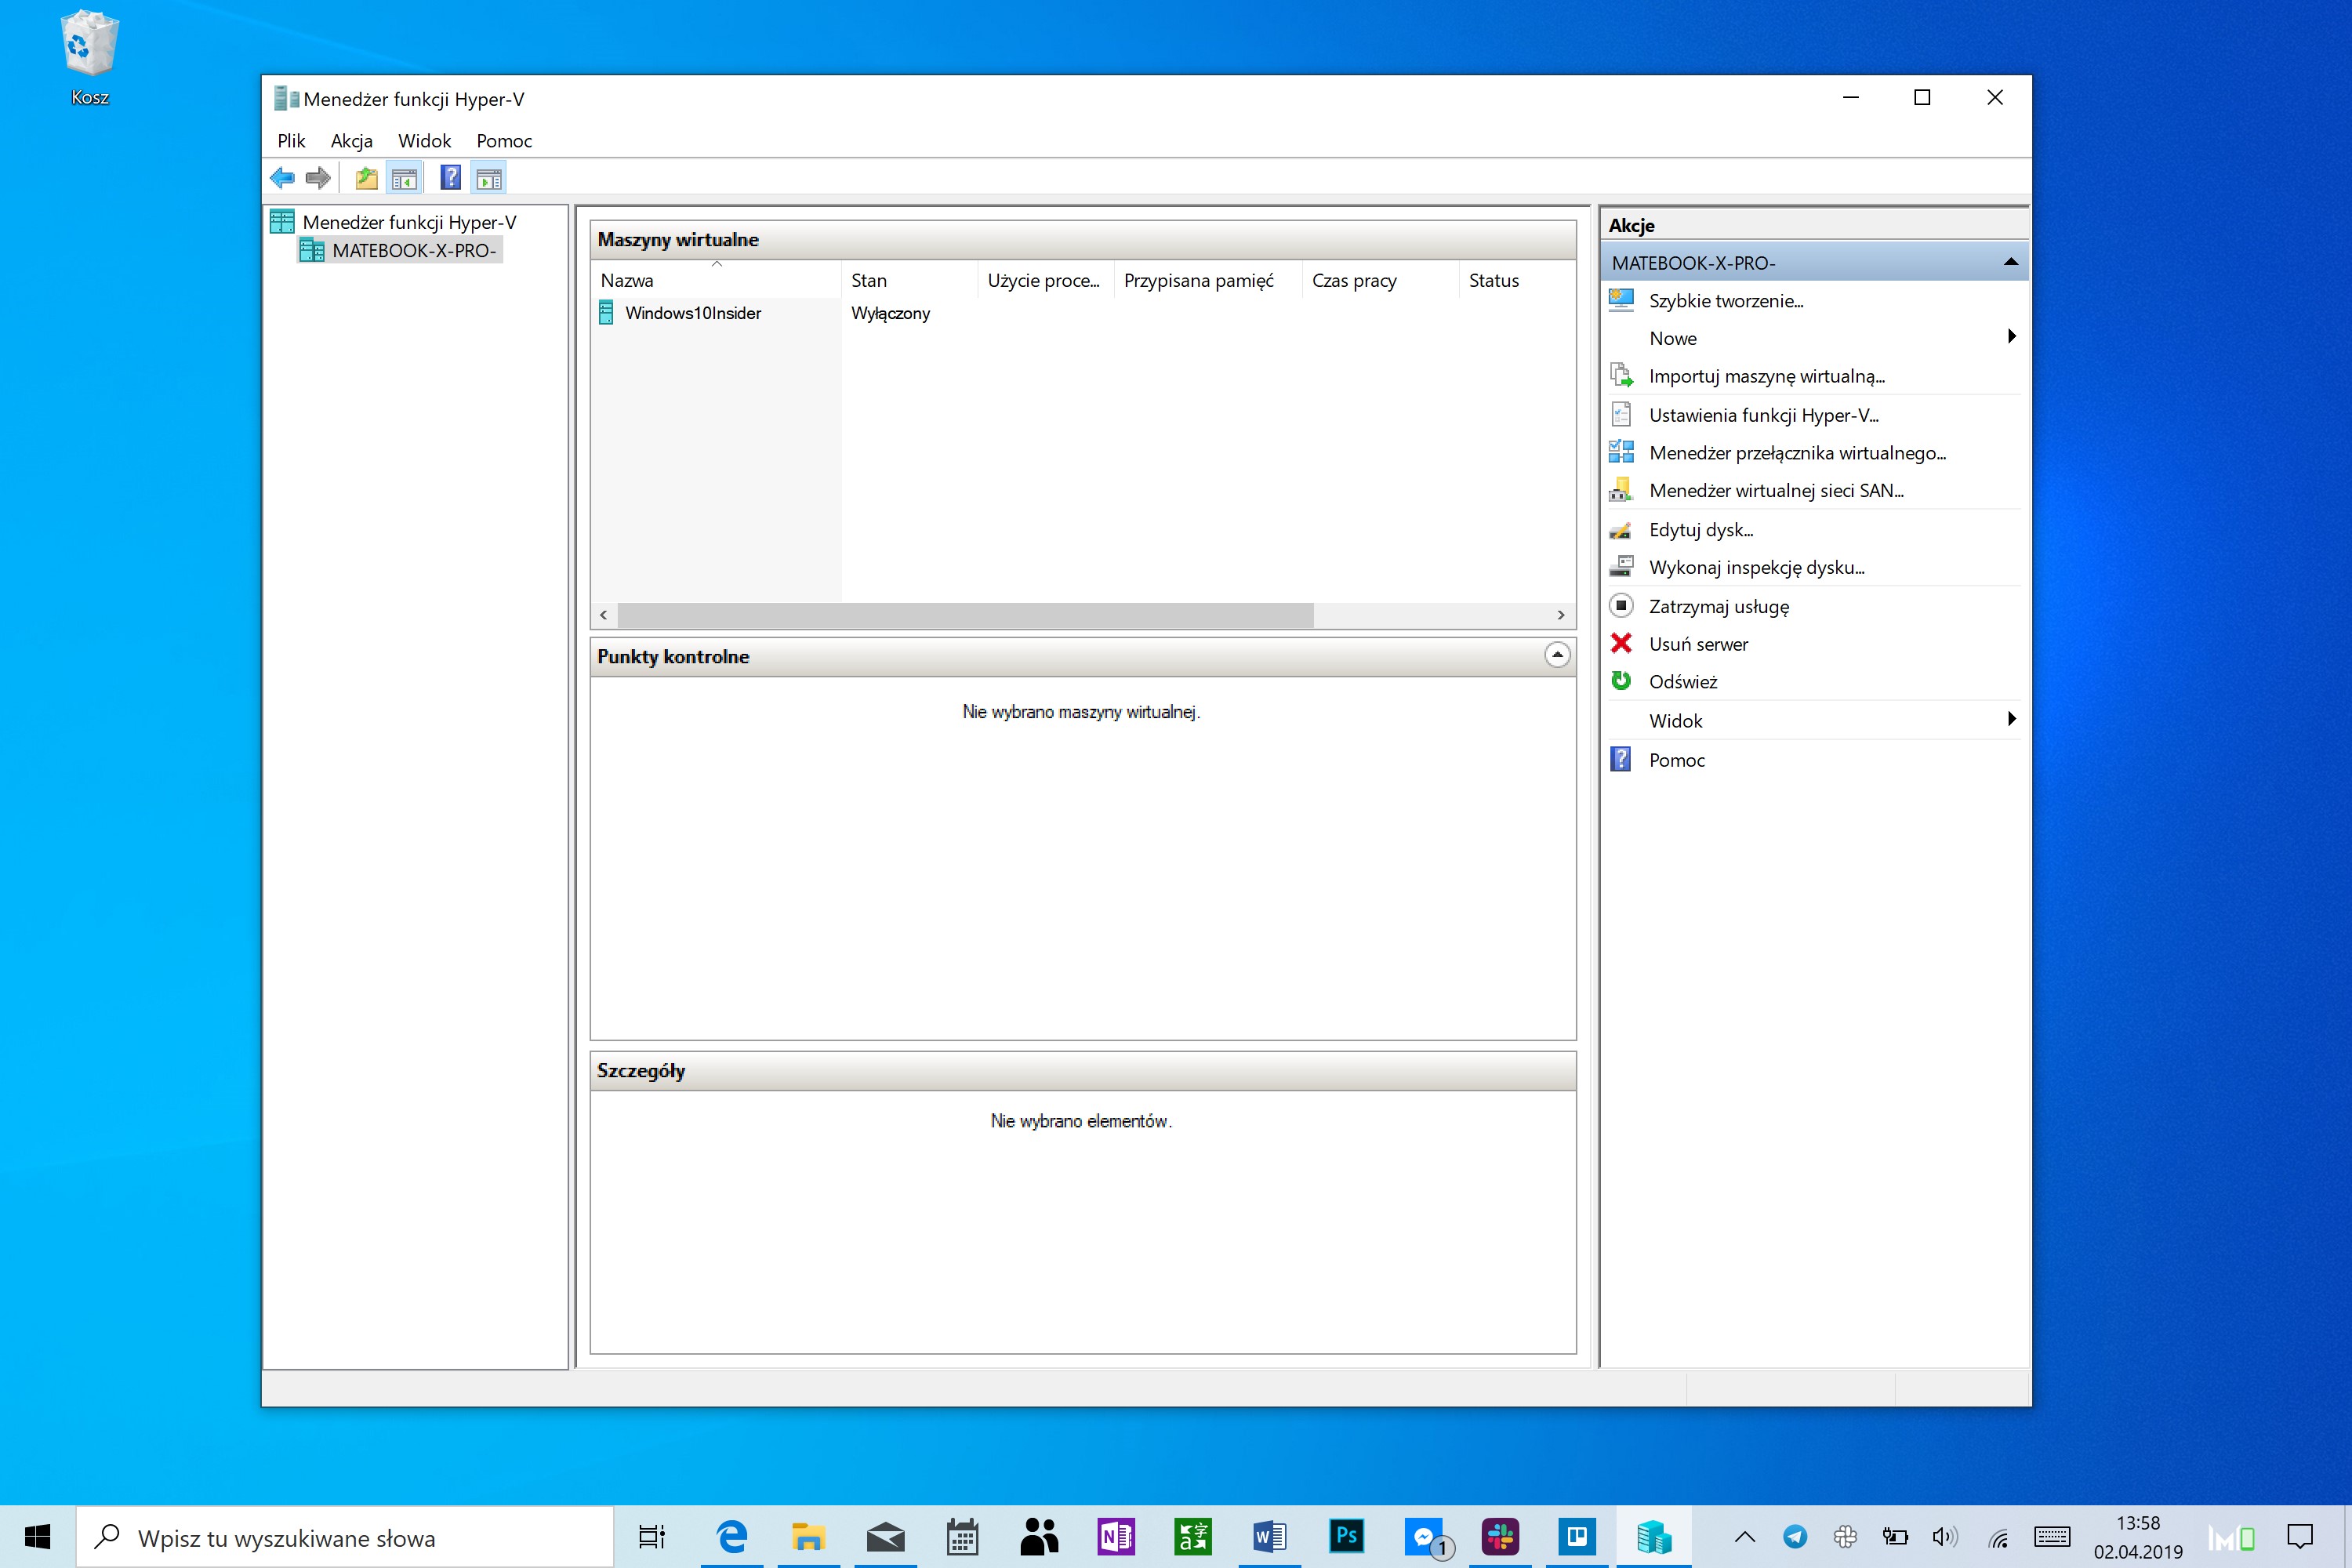
To this end, we run our virtual machine application. The Hyper-V used here offers automatic creation of a ready machine based on the operating system we want to virtualize - which is why the whole process is just a few mouse clicks - but we will do it in a standard wizard so that users of other applications know exactly what to click. This quick creation is available in the Quick Creation menu in the upper right corner of the interface, but we will click on the New and then the Virtual Machine below it.
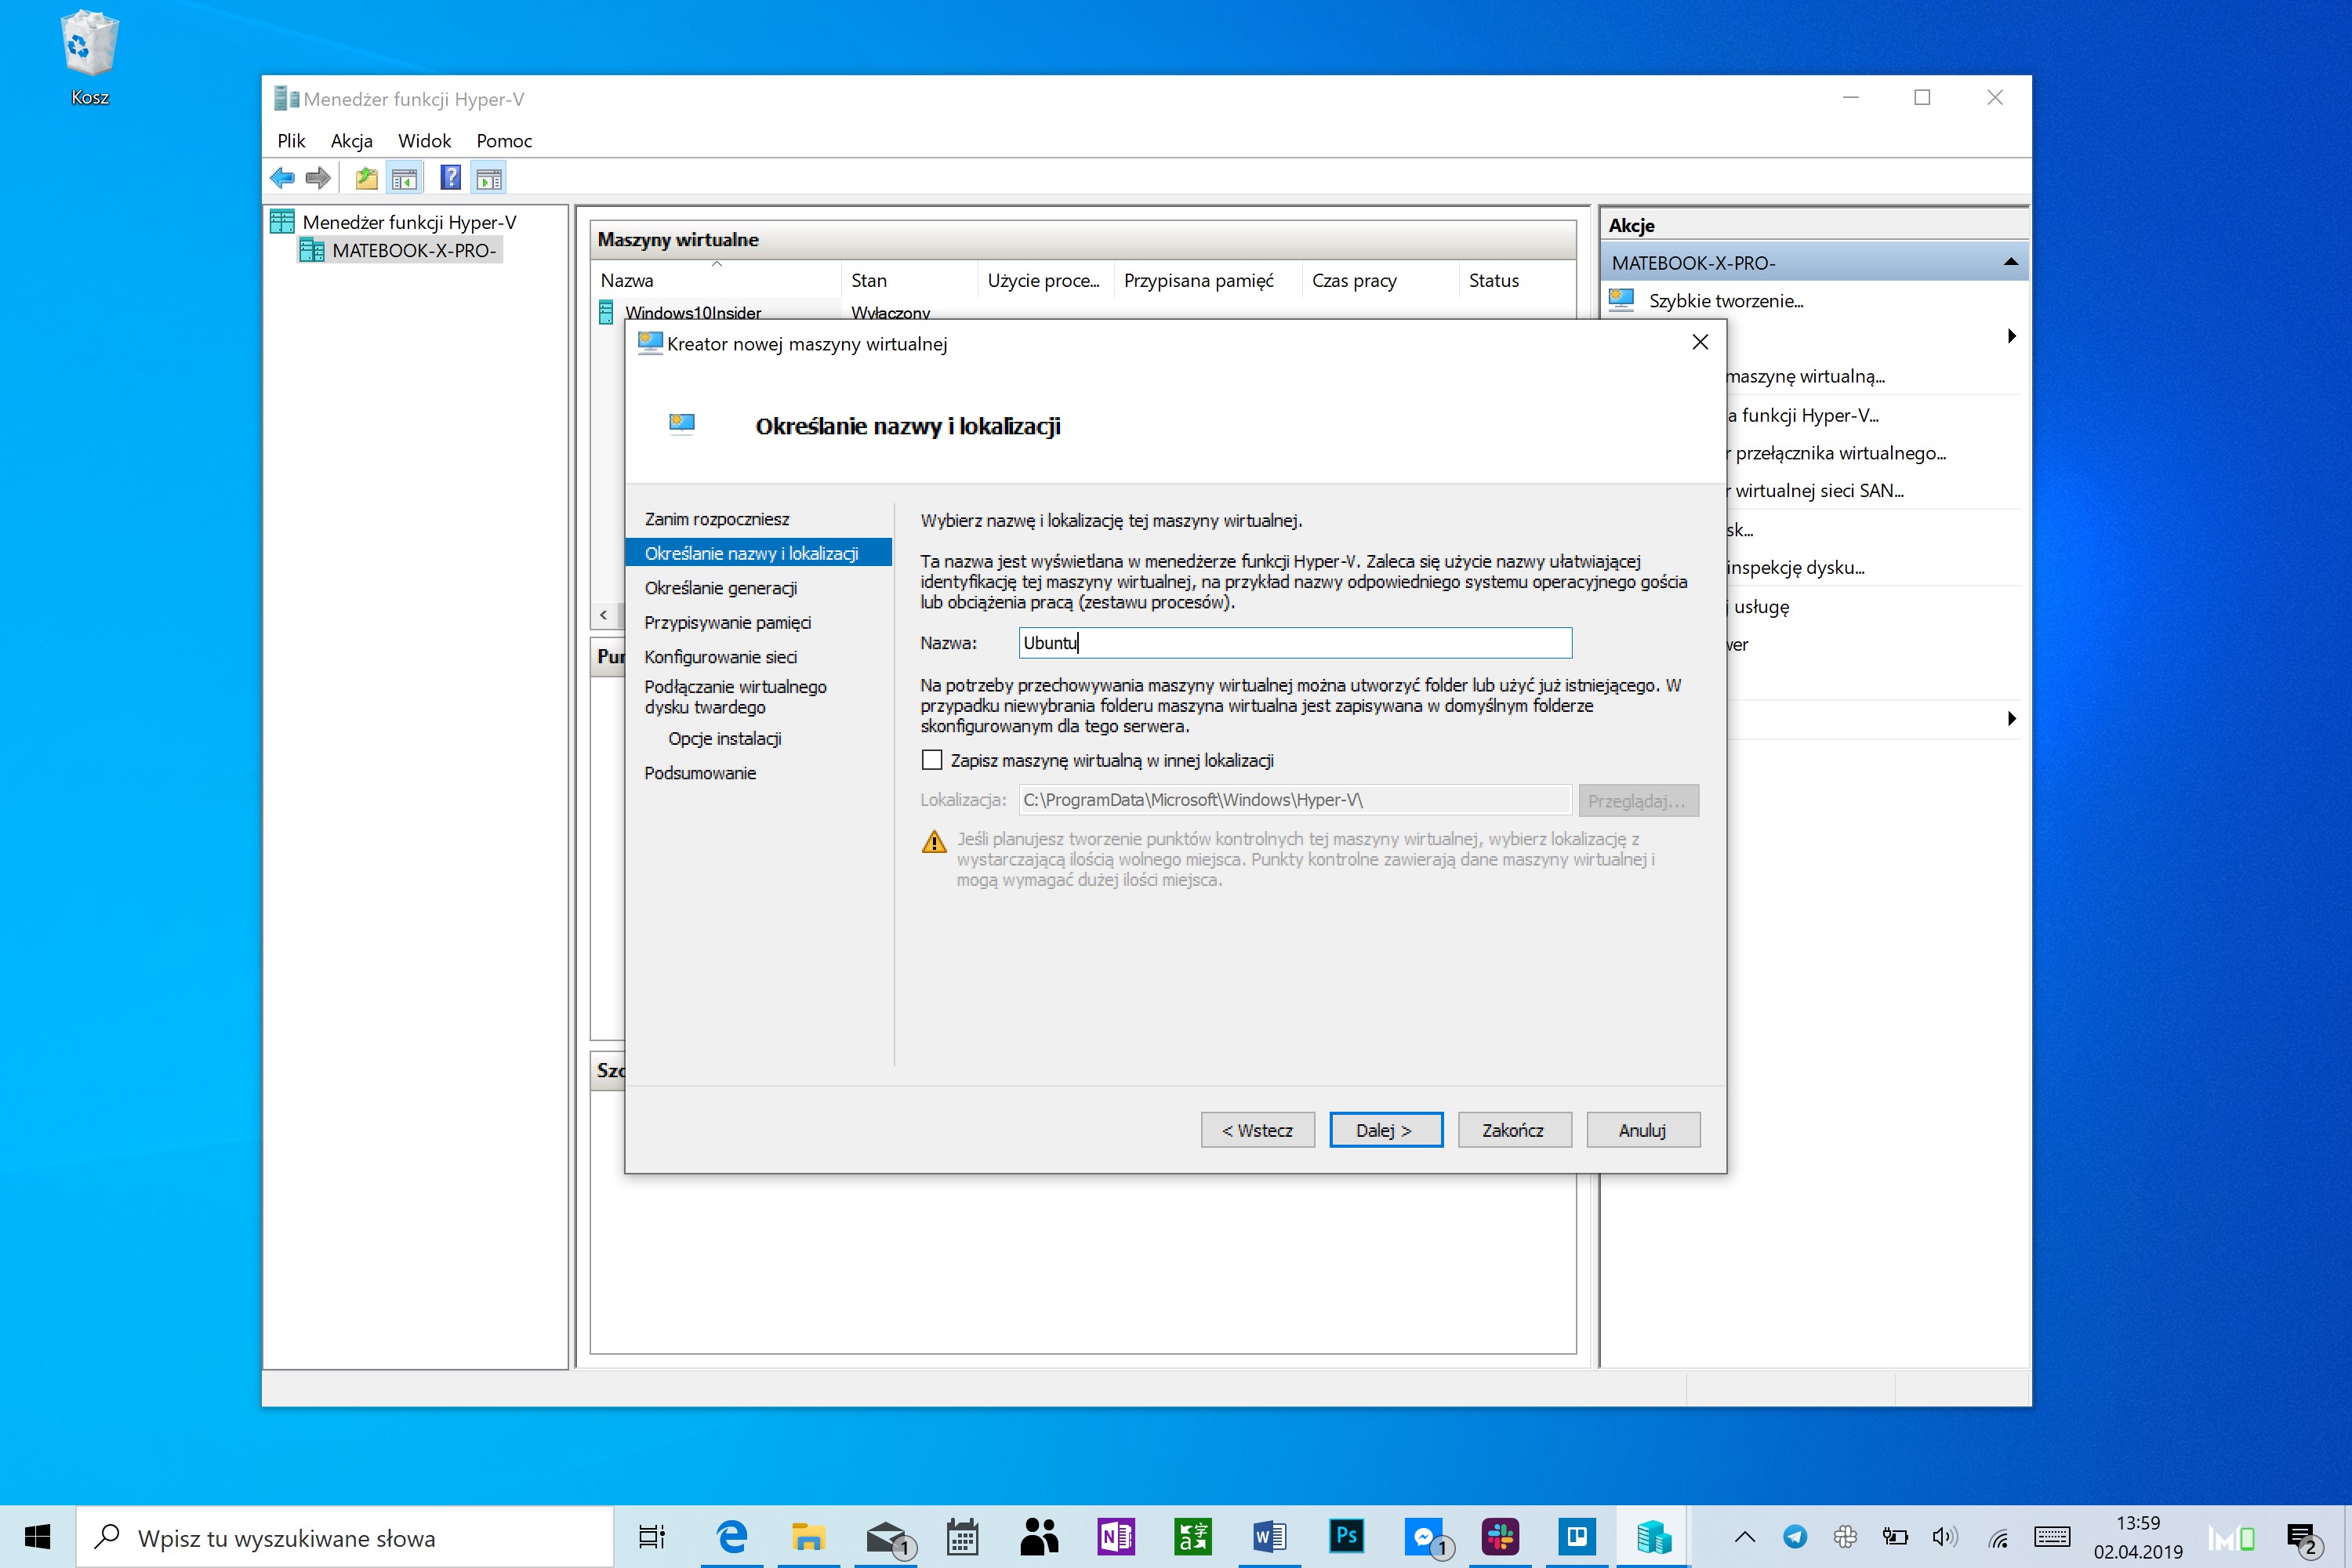
The first question the wizard will ask you is the name of our virtual machine. It does not matter much, although of course it is worth giving a name that is understandable to us. We can also indicate the folder in which this machine will be created.
The second question is the generation of a virtual machine. This is a rather unique question for Hyper-V. In any case, let's choose the first generation that works better with non-Windows systems.
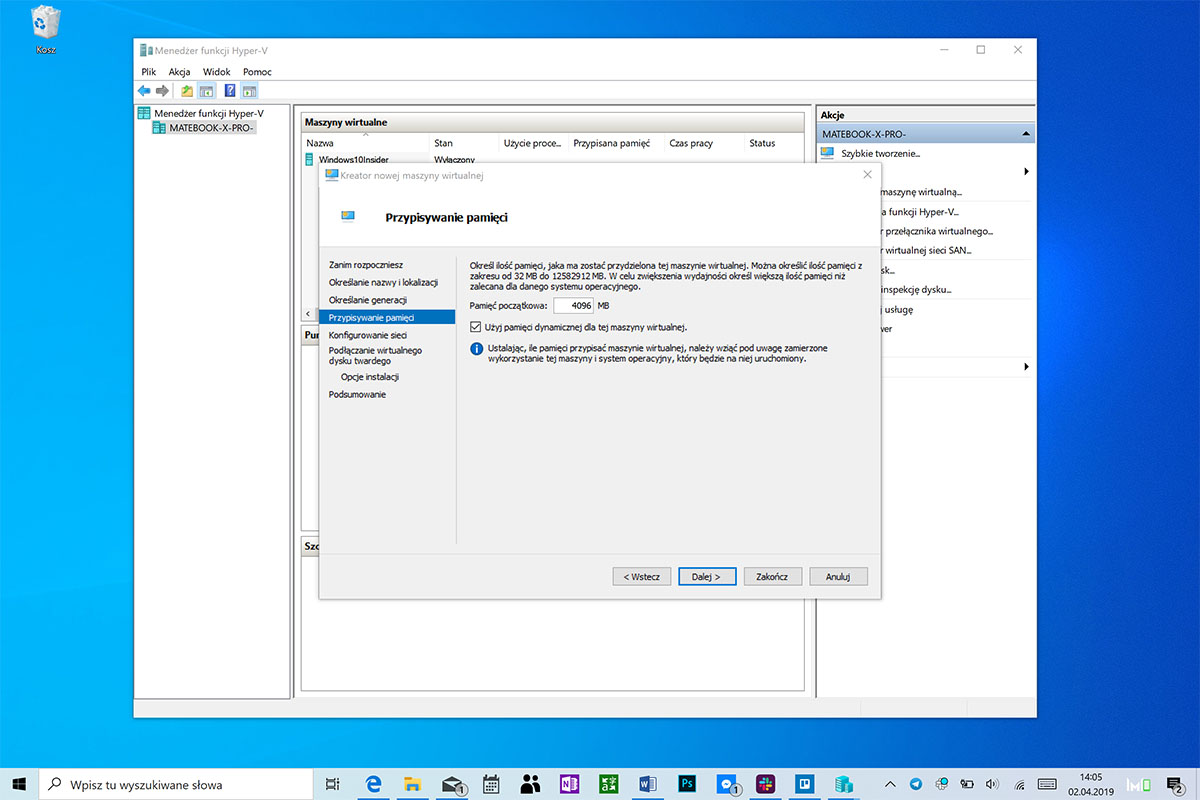
The third question is important. The application asks us how much RAM can give to virtualized Linux. Remember that this memory will not be available to our physical machine when the virtual one will be running. The more RAM we assign to the virtual machine, the less it will be available to the physical (and vice versa). So let's assume that each machine should have a minimum of 2 GB, and preferably 3 GB of RAM. My computer has 8 GB of memory, so I will divide it equally.
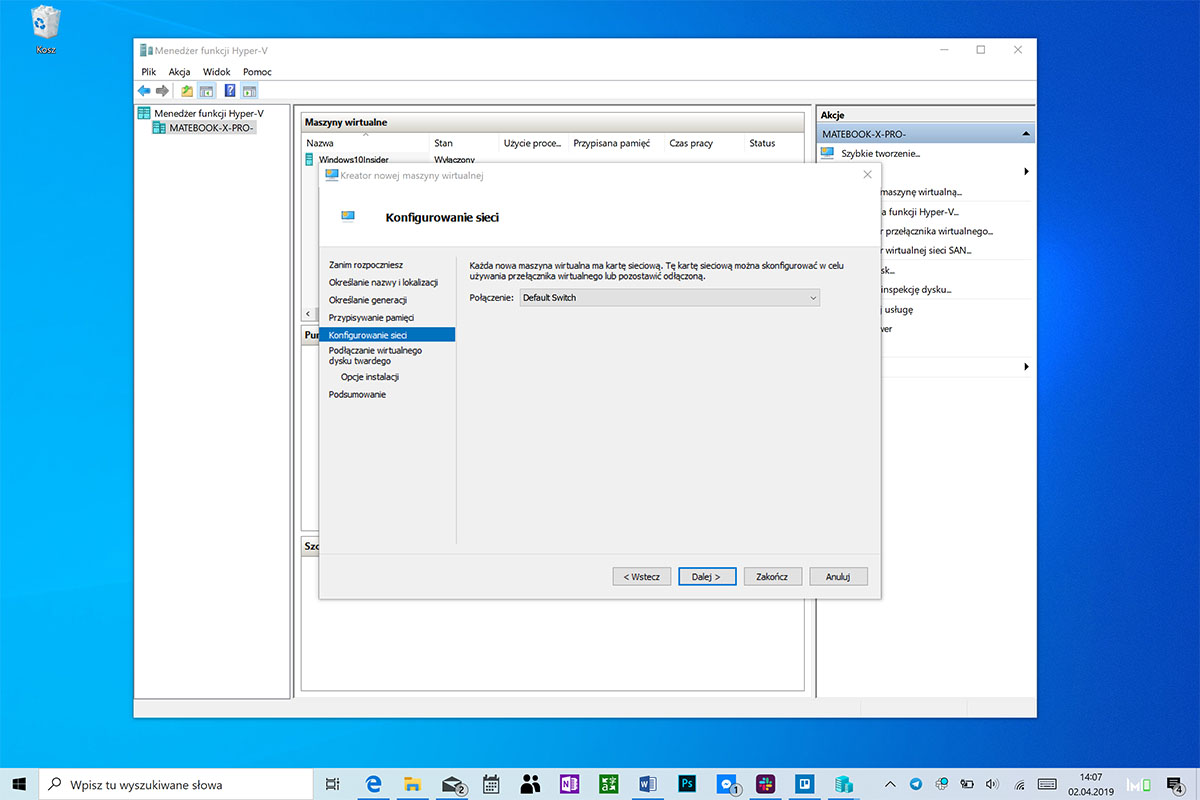
The fourth question is about access to the Web. We can decide which virtual network switch will be available for our virtualized system. However, we do not administer a complex network of virtualized machines, we only want to play with the new operating system. By default, the created Default Switch is an option that you want to choose.
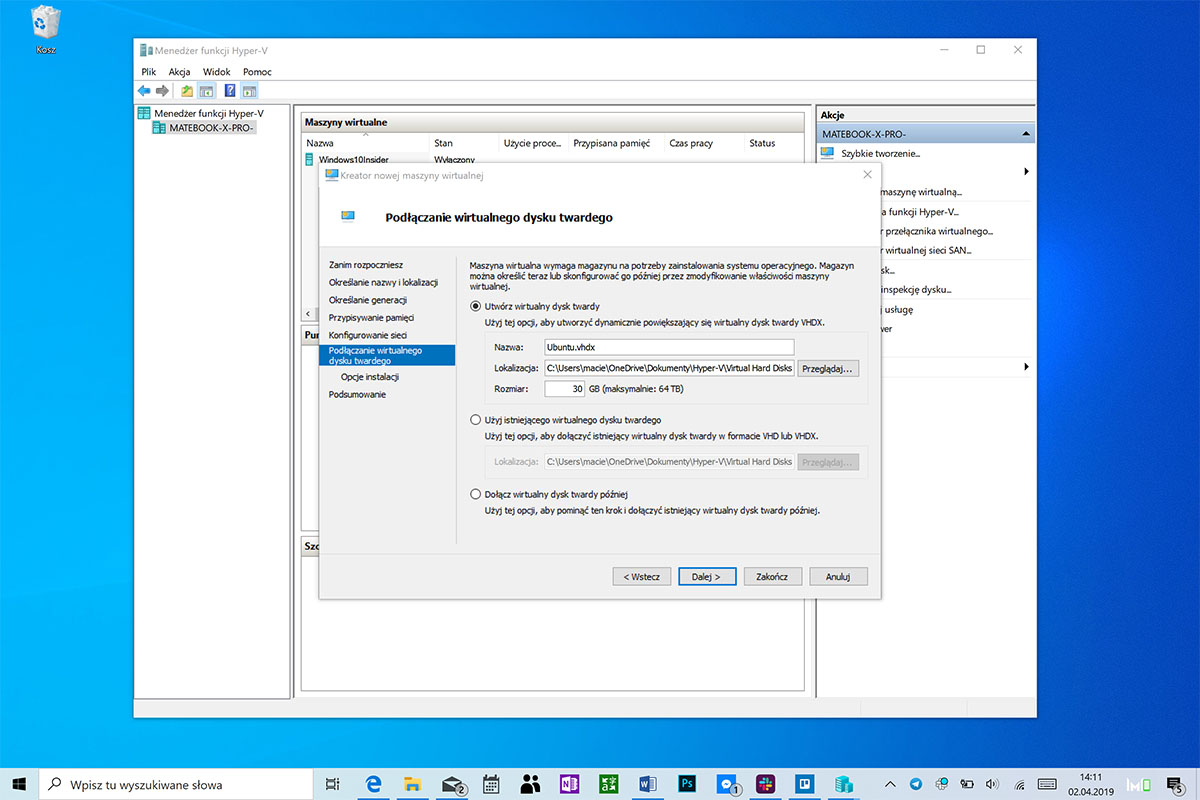
The fifth question is important. This applies to the virtual hard disk that will be made available to our Linux. It will be visible from the outside as a file of a given size. This size should accommodate both the system itself and the applications we plan to install on it later. In the case of Ubuntu, I do not think that our needs go beyond 30 GB. We can also indicate the folder in which the virtual disk file will be saved.
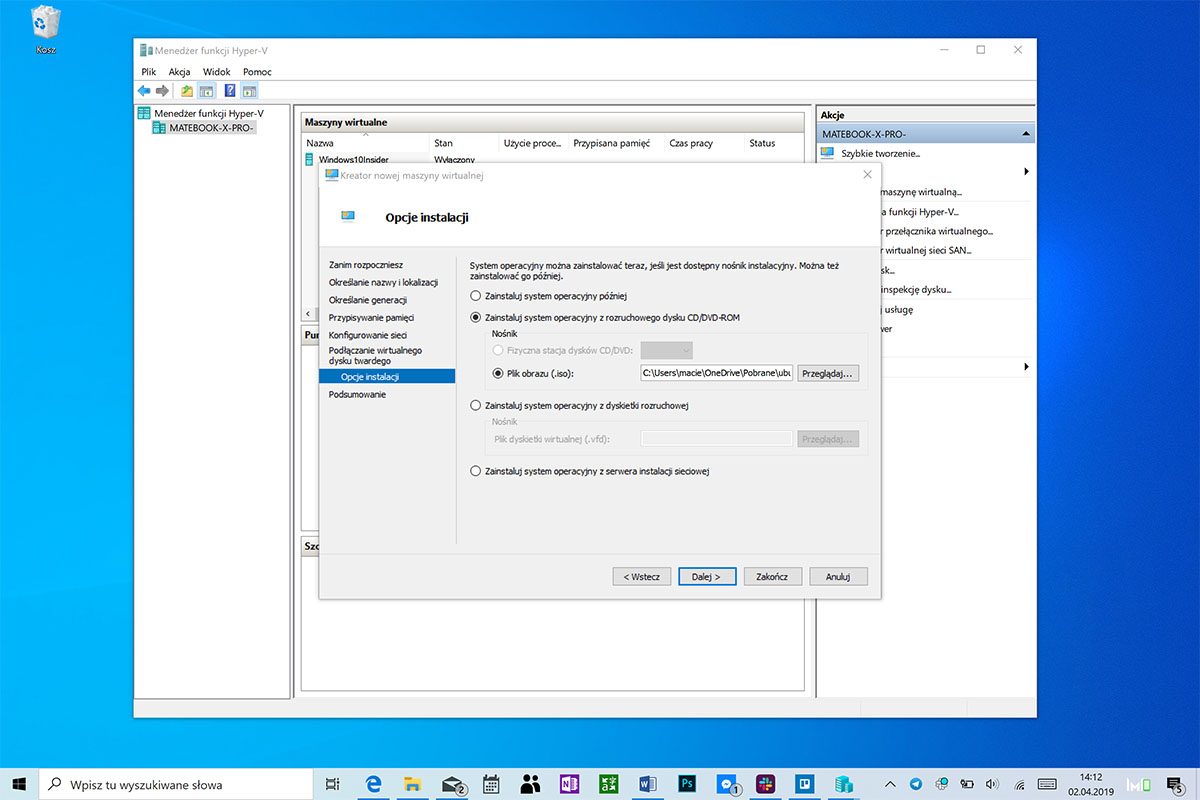
Sixth, last question. The application asks us where the installation image of the system is located. We show him the file we downloaded in the first step.
After passing through the entire wizard, a new virtual machine will appear in the interface of our Hyper-V.
Step three: run the virtual machine with Linux.
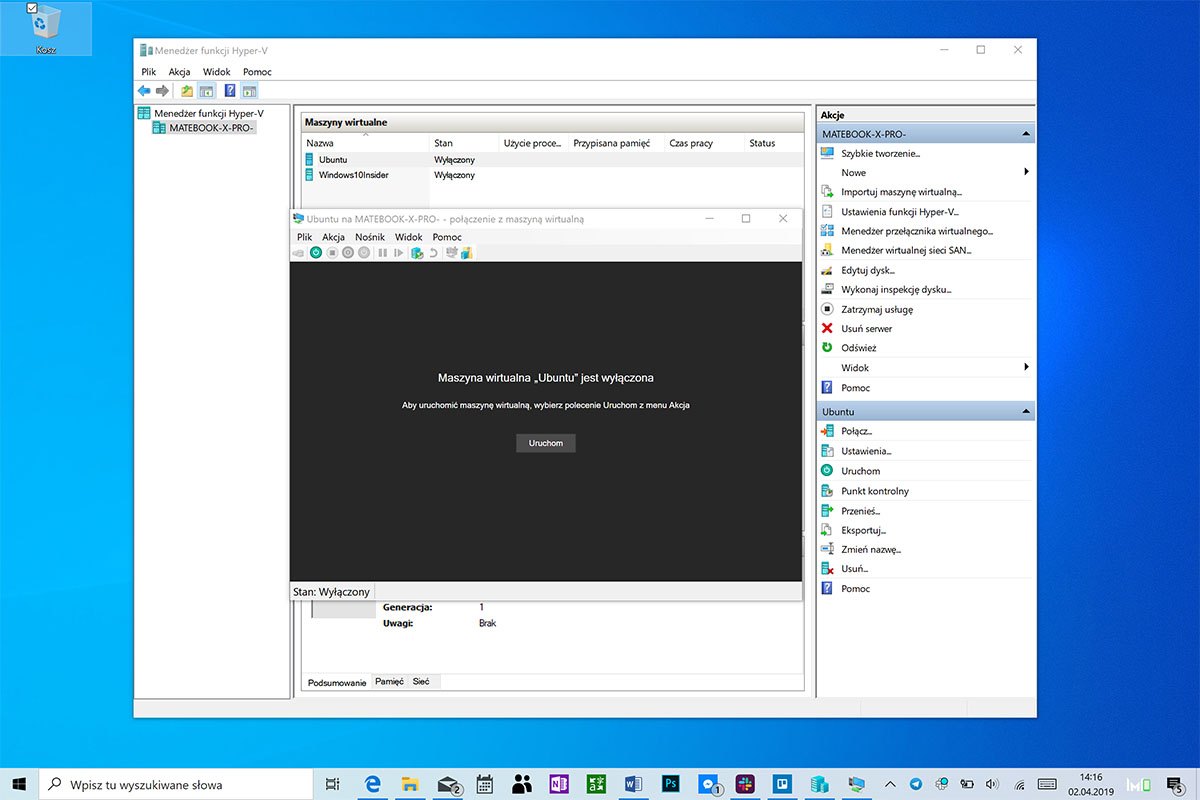
To do this, click on this machine and then on the Connect ... button in the side panel. We will open a new window with a header named in the same way as we named our virtual machine. We click Run .
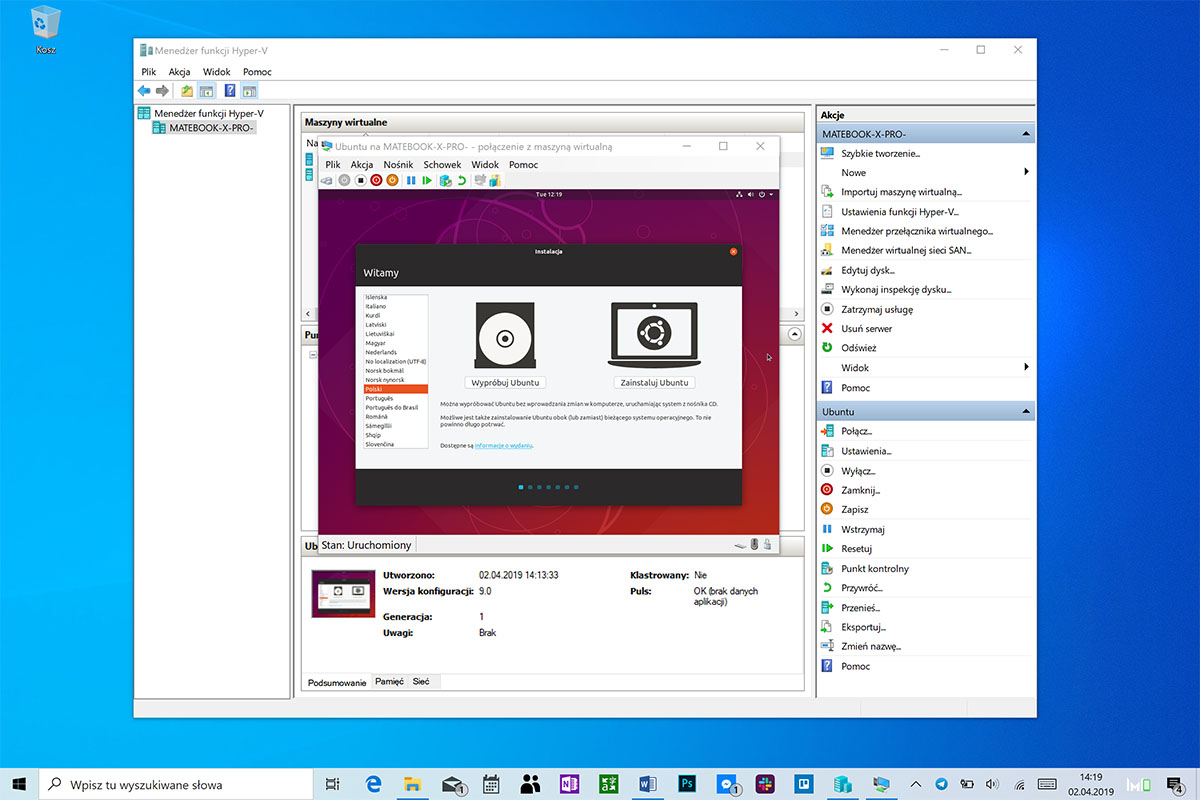
Above is magic. You can see the Ubuntu operating system installer. We answer only a few simple questions about the language version, time zone or username and we are waiting for the virtual operating system to be installed.
Step four: I'm falling!
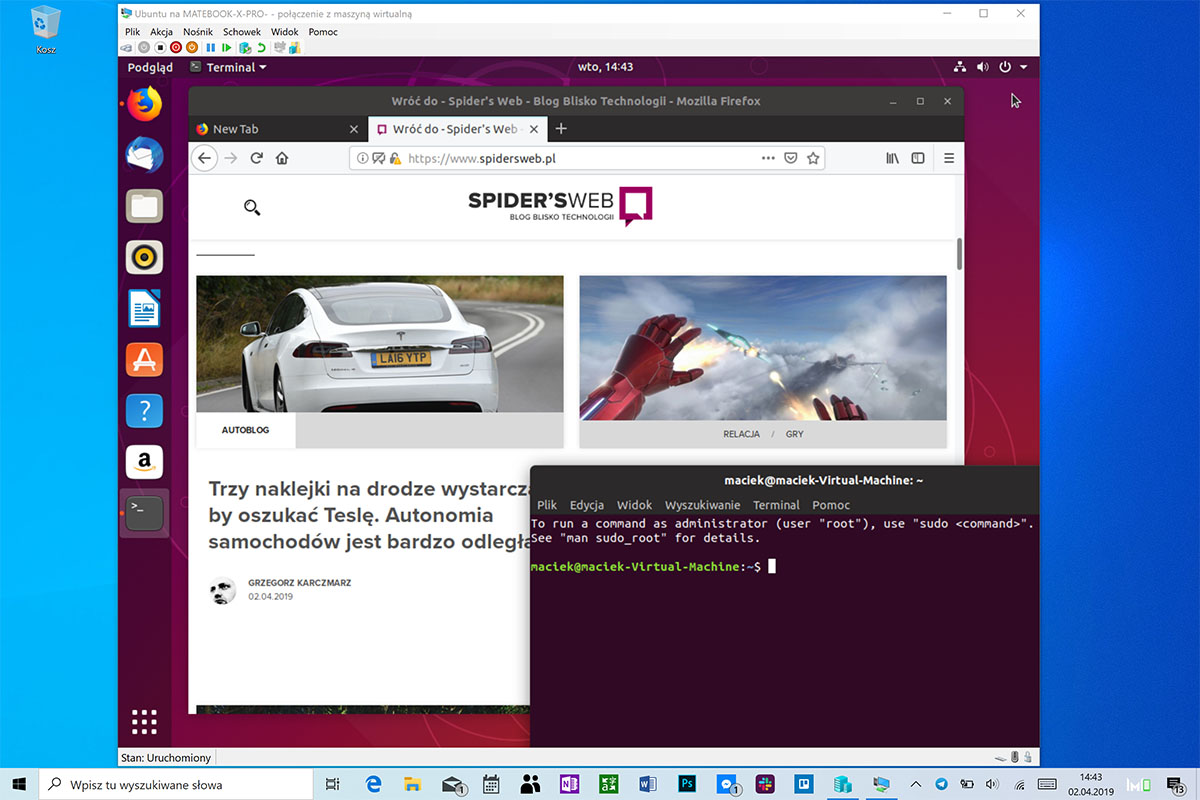
A fully working Ubuntu is ready to go. To illustrate the fact that it is a virtual machine, I put it in the window on all screenshots, but we can of course display it in full screen, masking the Windows or macOS operating in the background. We can play with the virtualized system almost without consequences, but of course, remember that it will not work as efficiently as the system installed by traditional method. Probably, however, we do not plan on such a system to render visualizations in CAD, but to learn about new software and learn how to use it. Thanks to the virtualization technology, we can do it without worrying about the health of our computer and our data.
Only a few steps away from the stress-free testing of Linux on your computer - a guide
Comments
Post a Comment